OAuth 2.0 in simple words

I was on a video call with a friend, discussing Azure and open-source stuff. After a while, we ended up in OAuth 2.0 and OpenID Connect (OIDC). I felt like I'm in a situation and not comfortable with the topic due to the lack of knowledge.
I spend quite some time on OAuth 2.0 and OIDC to get to the bottom of them. God! I ended up with a bunch of scary resources on the internet that puzzle me rather than clarifying the ambiguity. This's the reason behind this blog. Hope you find it useful.
In this blog, I gonna walk you through just OAuth 2.0, not OPID due to not making a long blog and less efficient. Let's keep it short and make it as clear as possible. Hope this can fall a missing piece of your puzzle right into place.
Table of contents:
What is OAuth?
Let's start with a sensible example. Imagine that you're hosting a party in your house, and you don't want your friends to have access to your entire house except the kitchen. In this scenario, think of yourself as a resource owner who owns the house and its resources; and your friends as the third-party applications (clients) who want to access your resources.

Now, let's bring OAuth 2.0 to the play:
First, you set some rules for your friends and explain that they can only access the kitchen where some snacks will be kept. They can't enter any other rooms or use other resources in your house.
Second, when your friends arrive, they ask permission to access the kitchen and get snacks.
Third, instead of giving them the keys, you give each of your friends a specific temp access token valid for only a certain amount of time.
Fourth, They'll join the party with the access token that grants them access to the kitchen.
Fifth, once the party is over, their access token will be expired, so they can no longer access any part of your house.
In this analogy, the party is your web application, the kitchen is your protected resource, the snacks are the data or functionality within your resource, and the access token is the key to accessing that resource.
As it's obvious, OAuth 2.0 is all about delegation of access. It allows third-party applications (clients or your friends in our case) to access specific resources (the kitchen) on behalf of the resource owner (you) without giving them full access.
OAuth 2.0, which stands for “Open Authorization”, is a standard designed to allow a website or application to access resources hosted by other web apps on behalf of a user. It replaced OAuth 1.0 in 2012 and is now the de facto industry standard for online authorization.
Be aware that this is just a simple example to make OAuth as simple as possible for you, and it can be more complex when it comes to various flows.
OAuth 2.0 terminologies
Before we dive into details, let's avoid confusion and clear some OAuth terminologies. If you're already familiar with them, skip this part. OAuth 2.0 involves several actors and components:
Authorization Server: The key component of the whole OAuth. This server receives requests from the Client for Access Tokens and issues them upon successful authentication and consent by the Resource Owner.
Resource Owner (User): The individual who owns the resource (like a user's data) and grants permission to access it.
Client (third-party applications): The application requesting access to the user's resources.
Resource Server: The server that hosts the user's resources and can verify the validity of the token.
Authorization Grant: A credential representing the user's consent for the client to access their resources.
Access Token: A token granted by the authorization server that the client uses to access the user's resources on the resource server.
OAuth 2.0 flows
There're several flows in OAuth 2.0 that we need to pick a proper one based on our scenario and requirements. Here, I just wanna cover only two of the important ones.
Client Credentials Grant Flow
This is the most simple flow in which only two backed service talk to each other and there is no UI involved, also known as a non-interactive application.
Imagine, there are two APIs. API1 is a consumer of API2. As you can see in the picture below, API1 before calling API2, is going to ask the Authentication Server to get an authorization token with which it's possible to communicate with API2.
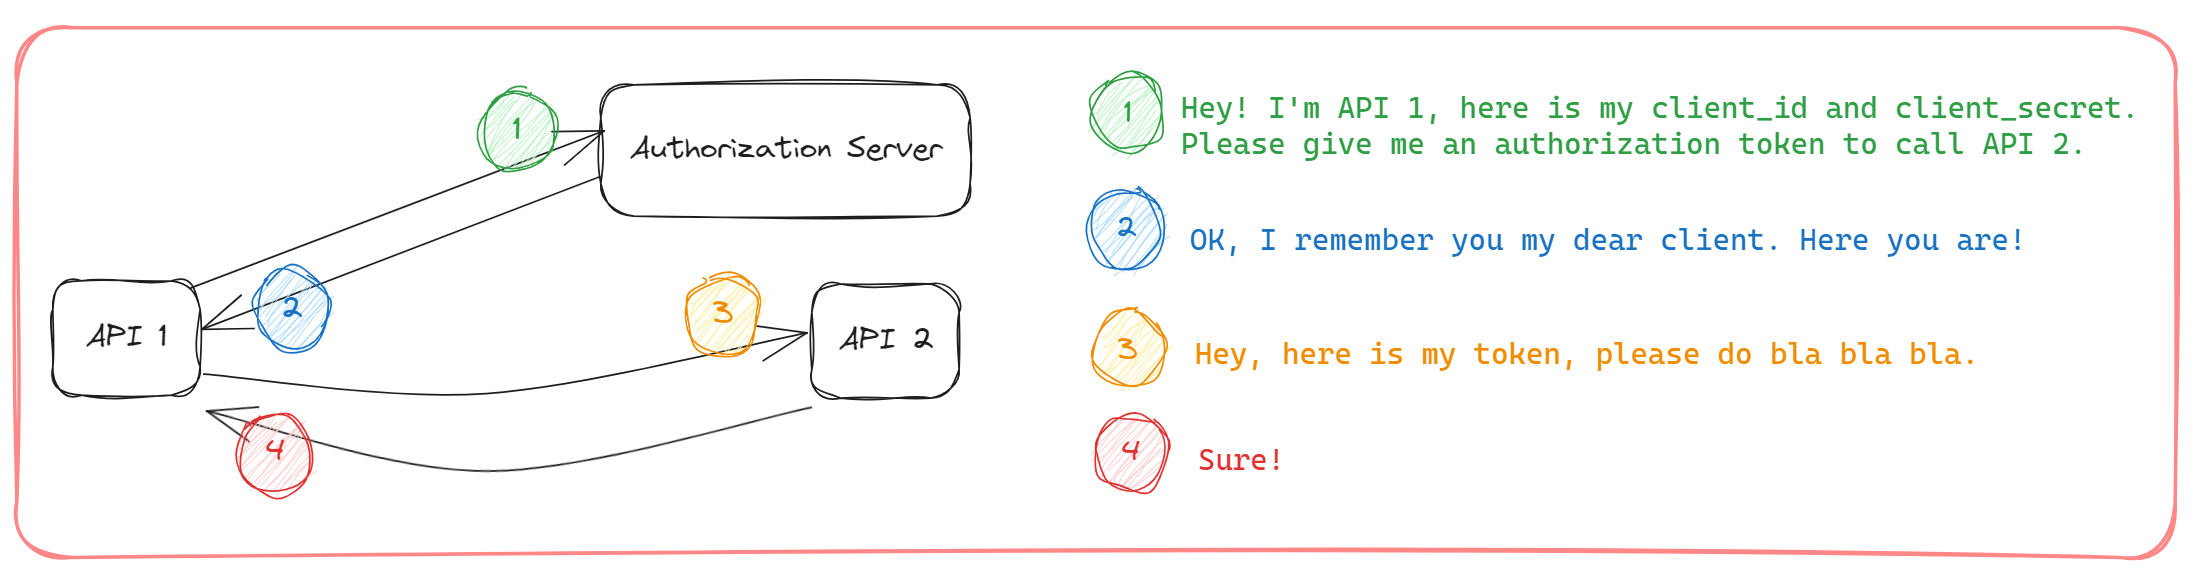
API1 first needs to be registered on the authorization server as a client (this happens in all flows). In return, the server assigns an Id and secret to the client. After that, the client is good to go and authenticate itself on the authorization server with those credentials. And then, the rest will be proceeded, as you can see in the picture above.
This flow is pretty straightforward to understand. We use this flow for machine-to-machine interaction because the client_id and client_secret need to be stored in a safe place like a backend server.
Authorization Code Grant Flow
As you can see from the below picture, it's quite complicated than the other OAuth flows; there're more parties involved. At the same time, it's the most secure one, since a temporary code (Authorization Code) is returned from the authentication server to the client UI, and the client back-end will exchange it for an access token.
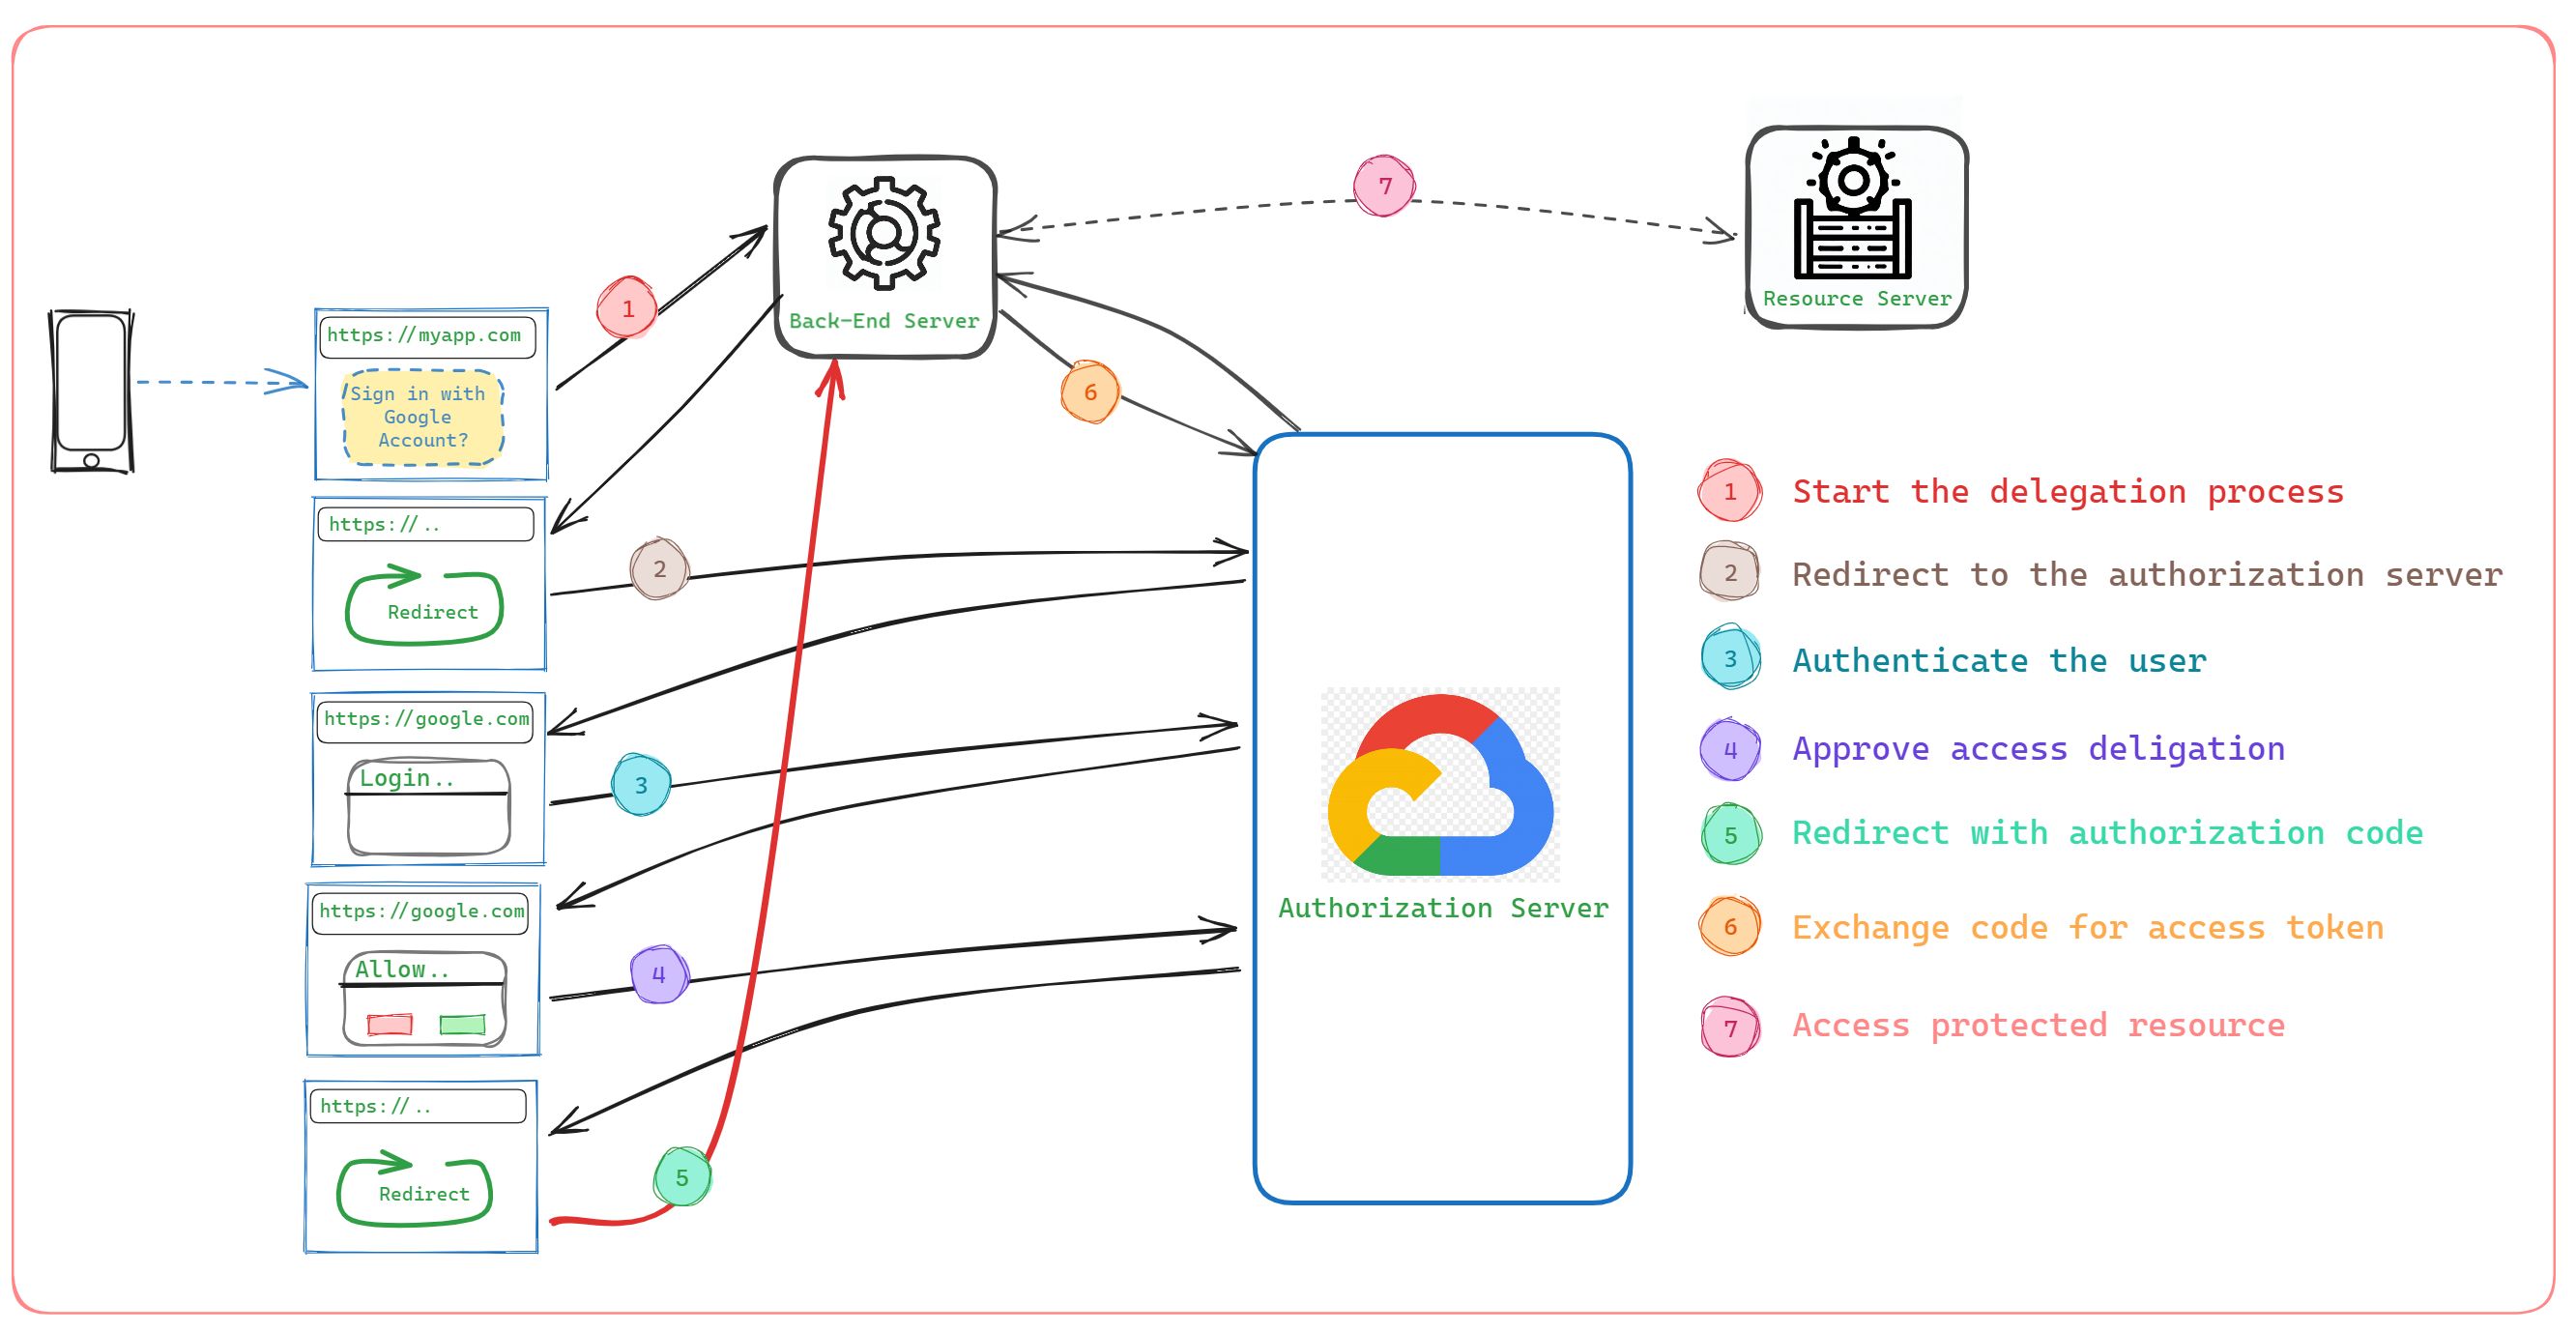
Let's look into it over a real-world example of the Authorization Code Grant Flow.
Consider the scenario of a user wanting to log in to a fitness tracking application using their Google account and then the app can use the Google Fit API (Google Fit is a health-tracking platform developed by Google for the Android operating system).
User (Resource Owner): The user wants to use a fitness tracking application (Client) and authenticate using their Google account.
Client (Fitness Tracking App): The fitness tracking app integrates with the Google API to enable users to sign in using their Google accounts.
Authorization Request: When the user clicks on the "Sign In with Google Account" button in the fitness tracking app, the app initiates the OAuth 2.0 authorization code grant flow. The app redirects the user to the Google OAuth authorization endpoint and includes its client ID and a redirect URL. (step 1, 2)
Google (Authorization Server): The user is redirected to Google's login page, where they enter their Google username and password. If the user is already logged in, this step will be skipped. (step 3)
Authorization Decision: After successful authentication, Google presents the user with an authorization screen specifying the permissions the fitness tracking app is requesting, such as accessing the user's basic profile information and fitness activity data. (step 4)
Authorization Grant: Assuming the user grants permission, Google generates an authorization code and redirects the user back to the fitness tracking app's redirect URL along with the authorization code. (step 5)
Authorization Code Exchange: The fitness tracking app receives the authorization code from the redirect URL and request to Google's token endpoint, providing the authorization code, client ID, client secret, and redirect URL. (step 6)
Access Token Request: Google's authorization server validates the provided information and, if valid, issues an access token and a refresh token to the fitness tracking app. (step 6)
Access Token Usage: The fitness tracking app can now use the access token to make authorized requests to the Google API. For example, it can retrieve the user's fitness activity data from Google Fit API.
Accessing Protected Resources: The fitness tracking app sends authorized API requests to the Google API, including the access token in the request header. Google verifies the access token and provides the requested fitness activity data to the app. (step 7)
As it's obvious, the authorization code grant flow gives delegated access to a back-end application. It can only be in this way; but Why? 🤔
Because you use client credentials to exchange your authentication code for an access token (step 6). If you wanna do that on a web browser or a mobile application, you would have to hard-code your secrets into that application. Then, it takes like few minutes for someone else to get that secret out and impersonate your client. So we should never ever do that.
Plus, this flow is only valid if your client can store secrets in a secure way which means a place like a back-end server. That's the reason that this is the only flow of OAuth 2.0 that gives you a refresh token because this flow allows the client to authenticate itself on the authorization server.
I'm not gonna go into the details of refresh token and that stuff here, also not other flows of OAuth 2.0. I'll share a few valuable resources at the end of the blog if you like to go further.
Conclusion
OAuth 2.0 is nothing more than a protocol for authorization that enables you to delegate your access. Simply put, it allows an application to access other applications on behalf of a user without giving full access. There're different flows in OAuth 2.0, and I covered the two most popular, Client Credentials Grant Flow and Authorization Code Grant Flow. Remember that the OAuth topic won't make sense by one-time reading unless many times. The more you read, the better you get.
Useful Resources
If you like to know more, here are a few useful resources. Do you know other good resources?! Feel free to share it with me, and I can add it here. 🙂
- Youtube video: Introduction to OAuth 2.0 and OpenID Connect • Philippe De Ryck • GOTO 2018
- Youtube video: OAuth 2.0 and OpenID Connect (in plain English)